Configuration Console Field Mouse Over Text

To add mouse over text to a field follow the syntax below

ContractorSubType
      mouse over text is "For_Travel_Nurse_\or_Visiting_Resident"


Configuration Console Tips

Different ways to use a Boolean Derived Field 


You may want to create a Boolean (true/false) derived field to define your multi-conditional criteria


You can then use the criteria to determine whether or not to display a form section or to display an individual field -


You can also use the criteria to add a field constraint -


You can also use the criteria to restrict an Action - in this case, if the criteria is not true then restrict the Action


Configuration Console Tips

Constraint of values in a field's dropdown list

You can apply a constraint to a field's dropdown so a specific value is hidden on a form.

By applying the constraint as shown, the 'WORKERS COMP' value will not be a valid selection for the user to select (on the form it is applied to), although it is a valid selection in the system.

This type of constraint doesn't include the text you normally apply to an Action or Form constraint.

Configuration Console Tips

Form Configurations

Layout
    single column - fields are presented in a single column
    two column - two fields are presented side by side 
    two column distributed - two fields are presented spaced apart depending upon the width of the fields and form

Add a custom label to a field
    single column
        field name
            label is untranslatable:"Enter_the_label_value"

You can also use 'camel case' so each word is presented in uppercase "EnterTheLabelValue" and the system will automatically add spaces so the display would be Enter The Label Value

Present a field as display only without a label
    field name
        display as text
        no label

Present a field's label in a color or in bold text
    field name
        color of red
        bold

Make a field required
    field name
        required

Add a Header to the various sections of the form
 
    header3 of "ConfidentialityAgreement"
        single column
            field name
            field name
    header3 of "User_Fields_are_Required"
        three column
            user field name
                required
            user field name
                required
            user field name
                required
                label is untranslatable:"DateOfPurchase"

Add Text to the form
    text of "The_following_information_is_helpful"

Add a Blank Line
    blank line
or
    text of "_"

Do something after a field has been updated
    two column
        StartDate
            when value changed
                EndDate = StartDate + 1 year
        EndDate

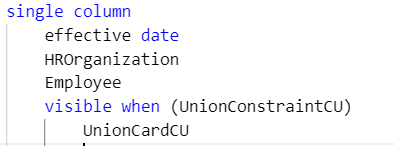
Make a field visible when another field has value
    single column
        StartDate
        visible when (StartDate entered)
            EndDate

The 'visible when' control is based upon a 'state' of a system value, a field state or a boolean value (which can be defined is a User Derived Field) and can apply to sections of a form or to individual fields

Make a form section visible when a system value exists
    visible when (BenefitEligible.No)
            single column
                text of "OR"

 
Infor GHR and ICIMS - Two Approaches to Integration

I have two difference clients using ICIMS for recruiting and integrating with GHR for onboarding new hires, processing rehires and performing transfers and promotions.

One client is processing a nightly pipe delimited file and the other is using API calls and checking hourly for new transaction data. I'm using IPA to process both integrations.

The client using the file integration is running the transactions through a data warehouse first and performing some edit checks and translations there before sending it to GHR.

The client using API calls is also sending Job Requisitions to ICIMS from GHR, once they're approved, and providing other feedback to ICIMS after the new hire is processed (GHR employee number), using API calls.

For this client, we are also retrieving the PDF documents from the candidates in ICIMS (Education, Certifications & Licenses) and attaching them to the Hire a Resource form. These binary data files are processed via API calls and saved first to the PfiFileStorage before being attached to the hire transactions.

Two clients with different approaches, but both successfully integrating ICIMS and Infor GHR.

Not just answers, providing solutions

Where is the problem? Is it a bug?


I've been involved with a lot of implementations and upgrades over the years and I'm certain that every one of them had hit a snag at one point or another. Whether miscommunication, improper training, or technical issues, all of these needed one step to get to the solution - an evaluation of where the problem lived.

Not just what issue are we dealing with, but where is the actual problem?

Is it a bug?

One project I was involved with had major allocation issues in the storeroom. Items were being allocated to orders before the item was even in stock. This appeared to be a major bug that would require escalation to the vendor before the client could go live, and that was the path the project manager was taking to get to a resolution.

I was one of several supply chain consultants, primarily brought in to help with pre-go live training and go live support. In other words, I was just there to help the team cross the finish line.

I don't recall if I was asked or if I just overheard about 'the bug' that was causing frustration, but I decided to look at the system settings.

The flag that allowed allocation on open PO's was set to 'No' correctly, yet the system was allowing it. That made no sense, so I kept digging and eventually found another setting that seemed to be contrary to the no allocation setting.

I don't remember the actual setting now, but I do remember that it seemed to allow for allocations when an item was on order (not yet received) and so I brought my discovery to the project leaders.

Expecting a high five for my doggedness, I was surprised when I was told that my discovery could not be the cause of the issue since the other allocation flag was set to no.

To their credit, however, they did allow me to run through some system tests and I found that this one setting, against all logic, was in fact where the problem lived.

Issue solved, go live saved, bonus awarded (not really). By this point everyone was just ready to get the issue behind them and focus on the important go live.

Not just answers, providing solutions

Infor Federation Services - Lessons Learned, Mistakes Made


When the company I was with first implemented IFS we made a lot of mistakes, quite frankly because no one told us the right way to do it. We followed steps that seemed to make sense from past processes in the Infor Lawson world, but which didn't work well in this IFS, ION, & BOD world we were moving to.

Security Roles - we created all of the security roles (from Lawson, Landmark, GHR & EAM) in IFS instead of feeding them from these systems via the Security Role Master BODs. This created problems when we later tried to utilize some features of 'role control' from GHR.

You can default roles on job/positions in GHR and we were hoping to automate removing roles when someone changed their job/position. The problem was that the roles in IFS were tied to multiple Logical IDs and simply removing them in GHR (and feeding those updates to IFS) didn't work.

When we removed the role from the user in GHR and sent the process security user master BOD to IFS, IFS didn't remove the role from that user (because it was associated to multiple Logical IDs) and the sync security user master BOD back to GHR added the role again.

Mistake made, lesson learned. Only associate one Logical ID to a Role by using the Sync Security Role Master BOD to add them into IFS with the Logical ID of the sending system.

Another issue we encountered in role maintenance - because we didn't understand our new world - was not cleaning up roles in Lawson that had been added only for the sake of using ISS sync with Landmark.

The old process required all Lawson security roles to be built in Landmark and all Landmark roles to be built in Lawson in order to keep the users in sync via ISS. This is not a requirement when security if maintained by IFS.

This duplication just clutters up IFS by associating both Logical IDs to these roles, especially since most users don't need access to non-GHR/FSM Landmark. [Yes, Virginia, there are two different Landmarks.]

Mistake made, lesson learned. Before migrating to IFS, take a look at your current setup and take the time to clean up what's no longer going to be required.

Not just answers, providing solutions

Infor Federation Services - Logical ID for your Infor applications


Roles are associated to Logical IDs and Logical IDs are associated to the various Infor (and non-Infor) applications that you can access within Ming.le.

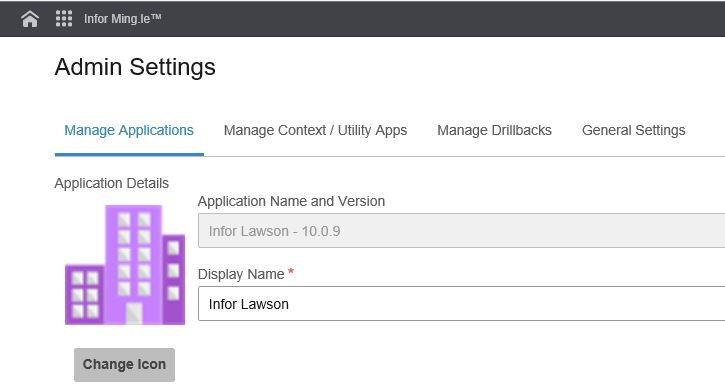
Within the Admin Settings menu, select the application to view and look for the Logical ID tied to that system.

Not just answers, providing solutions

Infor Federation Services - Are you a User?


We previously discussed Role Management but this time we're interested in User Management. Users are updated in the system(s) by the Security User Master (SUM) BOD but where do you maintain those users and their roles?

Within Ming.le you would access the User Management menu (click the Person icon in the upper right of your screen for the available menus).

Search for the User you wish to maintain and click the User Details link to open that user


Within the User, you can assign the Roles you want this user to have for the various Infor systems.


Click the + icon to add a new Role to the current user


The Logical ID identifies what system(s) are associated to each Role. In an ideal world, each role would be linked to one Logical ID, but you can tie more than one role to a system (see Role Management).

Check the box for the Role(s) you wish to add and click Add & Close (or Add if you need to add more roles on a different page). Once you've saved the User updates the SUM BOD will be triggered. This BOD will update the User's Roles in each system required.


Once the User receives access to a system, that system's icon will be available to them in the App Switcher menu.

Not just answers, providing solutions

Infor Federation Services - What Role will you play?


While security roles are stored in IFS, they are actually 'owned' by the systems they sync from.

Whether Landmark multi-tenant (MT), Landmark single tenant (ST), Lawson, EAM, Mongoose, etc. these systems own the roles and they send a Sync.SecurityRoleMaster BOD to IFS to create them.

You can create these roles in IFS, but that only confuses things when you later want to manage the roles assigned to users.

Here's a for instance; you used to have to create the same security roles in both Lawson and Landmark and keep the users in sync via ISS - this isn't true once you move to IFS.

Under this process, if a user needs a Lawson role assigned to him or her that role first needs to be synced over to IFS (from Lawson) and then assigned to the user in IFS. IFS will then send a Sync.SecurityUserMaster (SUM) BOD over to Lawson with the roles attached to the user.

In fact, the SUM BOD contains all of the roles per user for every system you're syncing to via IFS (by Logical ID). Those roles are rebuilt (removing the old roles and adding the new ones) when the SUM BOD is processed.

You can, if you decide to, update the roles for a user in Lawson and it will in turn send a Process.SecurityUserMaster BOD request to IFS asking it to remove the role from the user. Once IFS consumes the Process BOD request, it will re-send the Sync SUM BOD back out to make the change 'official' (for lack of a better term).

If a Role in IFS is assigned to more than one Logical ID (LID) - say Lawson and Landmark ST - and you remove the Role in Lawson then IFS will see the Role assigned to both Lawson and Landmark ST and it won't remove it from the user (it sees it as a valid Landmark ST role assignment).

In this case, the Sync SUM BOD will actually add the Role to back to the user in Lawson. IFS couldn't remove the role from the user because it was associated to two (or more) Logical IDs and so the security update back to Lawson will show that role as being valid to the user.

If you only setup the assignment of one Logical ID per Role (by letting the system which owns the role sync it to IFS),  you can perform the role updates in either that system or IFS.

Best practice, however, is to maintain which Roles are assigned to Users in IFS.

Not just answers, providing solutions

Infor Process Designer - GLTRANS ObjID References


We had an interesting problem to solve which involved pulling data from the Lawson S3 GLTRANS table (based upon ObjID values). We wanted to pull 2000 records at a time and then trigger another instance of the flow to pull the next 2000, and so on, until all current records were captured.

We didn't want to work with two different versions of the flow, one with the beginning range value preset and one with it being passed from the Trigger. That meant we needed a variable assignment that would know when the variable existed and when it didn't.

So, on the Start node, when we defined the beginRange variable we used a particular function to create the variable when it didn't exist but to utilize it when it did.

beginRange = (typeof beginRange==='undefined'?0:beginRange)

In some programming languages, this is referred to as an 'immediate if' statement, meaning to validate it now. We couldn't simply tell IPA to set beginRange=beginRange because the system returned an error saying that beginRange is undefined (when it didn't already exist as a Trigger variable).

To solve this, we found a function typeof which would evaluate the variable, even if it was undefined. In fact, that is the answer we wanted in the immediate if. If beginRange was undefined then assign the zero value to it, but if it wasn't undefined then assign it to it's own value.


The next problem to solve was to capture the first and last Obj ID values from the query loop. Notice in the JavaScript expression above, we included the record number reference when we assigned the query's Obj ID value to the firstObjId variable.

firstObjId=LwsnQuery3220_0_OBJ_ID

You may remember that the first record value in JavaScript is zero, not one. So we simply included the record number reference in the value we were looking for. You may have also noticed that we did not include a record number reference for the last Obj ID value.

The last returned value in the query (which was set to &MAX=2000) will always the value we're looking for so we didn't need to reference the record number. This also has the advantage of not having to account for when the query returned less than 2000 records.

Having captured the first and last Obj ID values, we could use them later within the flow and for when we triggered the next instance of the flow. The lastObjId value from the current flow became the beginRange variable value used when the next instance of the flow was triggered.

Not just answers, providing solutions

Infor Process Designer - JSON the Sequel


I showed you how to use the JSON Parser to parse your JSON data, but there is another way you can accomplish this using JavaScript in the Assign node.


Use the File Access to load the JSON file into memory and then an Assign - JavaScript Expression - to cycle through to retrieve your input values (which could then be written out to an export variable within the same function).

x=FileAccess5480_outputData.split("\n")
for (i=0;i
{
j=JSON.parse(x[i])
emp=j.Employee
dept=j.Department
outputData+=emp+”,”+dept+”\n”
}

We know that Infor’s JSON file doesn't always include the data elements when that value doesn’t exist, so you could build an edit for the fields that might be missing;    

dept=j.Department ;if (dept===undefined) dept=””


Not just answers, providing solutions

Infor Process Designer - Don't fear JSON

A JSON file is similar to XML, but with more of a flattened design, not requiring as many tags to present the same data.


The JSON Parser node in IPA is designed to extract each line of data and create/assign the values to variables.

In the same way a MsgBuilder creates the variable on the fly, the JSON Parser will create variables.

First you have to specify where the line of data is stored - if you're loading from a Data Iterator (looping through multiple lines) or if you have File Access (with just one line of data) or if your line of data is assigned to a variable.


Next, from a copy of the file saved to your local computer, you have to load that file into IPA by clicking the Sample Document button.


Then, you will click the Set Variable button to launch the JSON Text Composition builder.


Lastly, assign variable names to the data elements you wish to retrieve from your JSON data. Since the JSON Parser creates the variables as needed, you don't have to define them on the Start node ahead of time (but you can if you want to).

The JSON Parser only reads the first line of your JSON sample file. Some systems don't create tags for data elements missing on a record therefore you may not see all of the data that may exist within the file. 

Infor's Replication Set process is like this; in order to preserve a smaller file size, it will skip the tags if there is no data to present. [This is why some developers define their variables on the Start node - so they are available throughout the flow]

One solution is to make sure that the first record of your sample file contains all of the data elements you wish to capture.

If your JSON file/data changes (new data elements), you will need to reload the sample file into the JSON Parser and click the Set Variable button again, in order to assure the parser is refreshed.

Not just answers, providing solutions

Infor Process Designer - Another look at your XML

Before I got comfortable with the XML node I was shown another way to build out my XML data. This is also useful if you don't have access to the schema file.

You can use the MsgBuilder node to build a perfectly acceptable XML tagged structure.


Not just answers, providing solutions
Infor Process Designer - My Crazy XML Part 2

We previously discussed parsing with the XML node, this time we will discuss building an XML.

Set the XML node Action to Build XML Object and reference the Schema URL (or file path to the schema file).


Click the Build button and then assign the variables to the data elements. Variables in the XML node are wrapped in { } brackets.


Use the Ctrl + Spacebar shortcut to pull up a listing of your available variables.

If you are adding multiple data elements (lines of data) to your XML, you will have to loop and add each one separately and more than likely reference a line number.

You can build different sections of your XML data in separate sections of your IPA flow and combine them together in the final XML node  you build. For example, the loop above was named journalEntryBatchLines and then referenced in the final XML as shown below.


Not just answers, providing solutions

Southwest User Group Mega Meeting


If you're attending the Southwest User Group Mega Meeting in April, look for me as I present Integrating with ION on Tuesday morning @ 10:00 am.


Infor Process Designer - My Crazy XML (Part 1)


There are two functions you can perform with the XML node; you can parse an XML variable or you can build one. An XML document has a particular layout, with tags to identify the elements and values of the data you're passing back and forth.

IPA flows are actually saved in the XML format.

In order to read the XML file (loaded into your IPA flow as a variable), you have to first parse it.

Set your XML node Action to Parse XML String and enter the variable name that hosts your XML.

If the XML value is loaded into your flow as part of a Service trigger, the variable will be _inputData

The next step will be to identify the Schema of your XML - this can be either a web URL or a file on the server.

A schema file identifies the tag names and element types (string, number, etc.) of your data and is required for the XML node to know how to parse the data. There are different tools and websites available to build the schema from your XML file if you don't already have one available.

After passing the XML data through the XML node, you still have to retrieve the values the node has parsed out for you. You will do this with an Assign node.

Warning - don't freak out with what you're about to see!


Basically, the data from the XML has an address that you need to reference. Your XML data can contain both header and detail sections and may have multiple lines of data that you reference like an array.

The first part of the 'address' is the XML_output - what comes out of your XML node - and the remaining part are the tag names of each of the data elements that contain your actual data. If you look at your source data, you will see the same tag names and it won't be hard to match up the data you need to retrieve with the address you will need to reference to retrieve that data.

If your data contains multiple detail lines, you may loop through that section and include array references [0] [1] [2] for the different lines of data (which all have the same element name).

It may take a bit of patience the first time you go through this, but once you figure it out, it's not that complicated.

In part 2 we'll discuss how to build an XML.

Not just answers, providing solutions


Infor Process Designer - Another way to look at Files


In Landmark, click Start - Data - pfi - Business Classes and then select PfiFileStorage

You will actually see a listing of the files you've written to, or FTP'd to, the Landmark server. You can view the files and copy and paste the contents to your notes application. It is another way to 'look at your files.'

Not just answers, providing solutions

Infor Process Designer - What the FTP

We've covered the File Access, reading and writing to files on the Landmark server, but what do you do when the file is on another server? You can transfer a file from or to another server using the FTP node.


First set the source and destination file path and name (you can use a variable) and select whether the source file is on a remote server or the local server. If it is on a remote server, click the Is source remote? checkbox.

For remote servers you will also have to select the Configuration which contains the connection information (IP address, User, Password & Protocol).

The non-remote server side of the transfer only needs the file path and name. You can actually initiate a file transfer between two remote servers, one to the other. In that case, both sides of the transfer would be flagged as remote and both would require the Configuration to be selected.

Like with other configurations, you can only set one FTP connection so if you have more than one FTP site you need to connect to, you will need to create multiple configurations.


Give your configuration a meaningful name and set the Host. If you are connecting to an Infor server, the IP address will be configured behind the scenes and you can just reference the address. Otherwise, you will enter an IP address for the Host.

Set the Protocol - either FTP or SFTP. 

Multi-tenant Landmark environments only allow connections to SFTP sites.

Enter the User and Password for the site you're connecting to. Some remote servers have already assigned your user with a default directory so you may only need to enter the file name, and not the full path as well.

If you're transferring to/from the local Landmark server you don't need to configure the server, you will just not check the Is Remote checkbox on the IPA node.

Not just answers, providing solutions

Infor Process Designer - How Common


It may just be my OCD, but I like straight lines in my flow. One easy way to make this happen is to click over to the Common tab on your nodes and set the X and Y coordinates for where it is positioned on your canvas.


Another feature of the Common tab is the Description text area. This is useful if you like to comment the use of the node. I've heard people complain that you can't add comments to your 'programming' in IPA and I simply point them to the Description area on both the canvas (white space) properties and within each node.

Not just answers, providing solutions